Instructions for installing the Trade Control web interface.
ASP.NET Core applications can be hosted in a number of ways and environments, from very easy to involved.
This is the easiest option. For the latest installation advice, refer to the Product Delivery page on the application website. Once installed, you just enter the address into the browser on your phone or tablet and follow the instructions.
Azure App Services can host the web app on Linux or Windows, connecting to an Azure SQL database. The advantages of this implementation include:
We can install the App Services and Azure SQL database without cost. However, the subscription model of Azure is not rental; it is based on use. You will need to understand the configuration options to assess budgetary constraints.
Your existing website may support the app. Consult your systems administrator for feasibility and installation.
They will need to download the latest Release and modify the connection string in appsettings.json. If the Sql Server version is incompatible, the database can be generated from scratch using the Node Configurator.
Many companies have a fixed IP address and an SQL Server multi-user licence. A systems administrator can map a domain to the IP Address, install an SSL and host the web app on the company hardware using Windows or Linux. Your employees can then use their phones when off-site, and Office when they are on the business intranet.
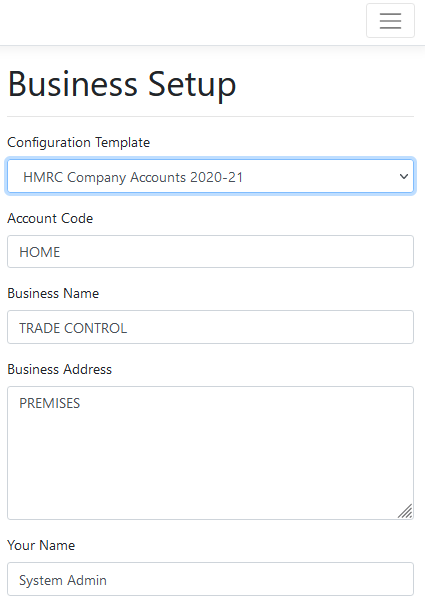
The app requires authentication to get past the home page. The first user to register their email address and password with the app is assigned an administrator role with login rights. Log on and you will be taken to the Initialisation form where you enter business identity and bank details. This form can be re-run from the System menu at any point, so you can re-boot the business after trying out the tutorials. Because each setting is remembered, it is worth entering in the correct values first time round. All these settings can also be amended from within an initialised business. If there is an error, you do not need to start from scratch.
The installation template you select determines how the business will be configured. The HMRC templates map cash to tax return codes, and therefore significantly simplify the submission process. You just enter in the corresponding values when filing your accounts. If you are working through the web app tutorial, change the year end to the previous month to replicate a year end. Otherwise, choose the start month you registered with HMRC.|
User registrations are processed from the System/Registrations menu option. When a new user registers, they cannot use the system until an administrator identifies them and assigns an appropriate role.
There are three types of role:
The Administrator menu, therefore, has more options, but the authorisation system still forbids users from entering un-authorised addresses directly. There is no theoretical limit to the number of users that can register or use the site simultaneously.
The web app uses a host to send out emails. As long as you know the smtp server and SSL port, most email addresses can be used. If you want to test sending an invoice by email, just use a Gmail account (smtp.gmail.com on port 465). Open Gmail security and enable Less Secure App Access.
Open System/Mail Settings to enter host details. Although it accepts several alternative hosts in case one becomes unavailable, only one can be active at any given time.
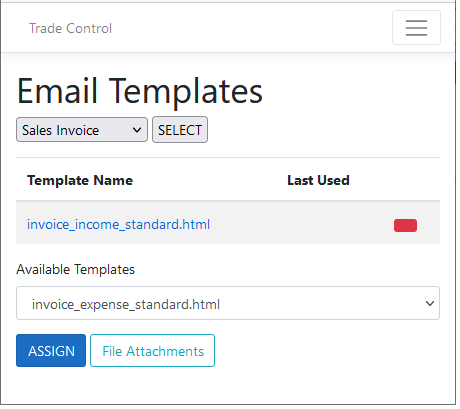
Emails are dependent upon html templates (e.g. Sales Invoices), associated images (e.g. Logos) and pdf attachments (e.g T&C). By default, there are templates for income and expense and another for emailing support requests.
Open System/File Transfer and Sync the files on the disk with the app. Here you can download templates for modification and upload them. You only need to synchronise if you are using external ftp access.
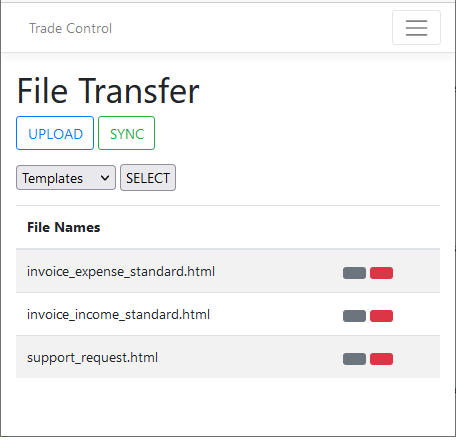
Select Images and upload your company logo using the name company_logo.png. This logo is also used by the default templates, but you can upload an alternative file and modify the template.
A document template is html with [Tags]. These tags are replaced with data when constructing a document. Images associated with the html need to be embedded in the email, so they also have a tag. Finally, it is common practice to attach PDF documents with invoices, such as Policy Statements, although this is optional.
From Invoicing/Email Templates assign a template to an Invoice Type. Select the template and assign the logo. Click the logo and change the default tag [TAG0] to [LOGO], which is used by the template. Finally, add any PDF attachments you want to send with your invoices and credit notes.
Because you can associate as many templates as you like with an invoice type, you can have templates for different scenarios (for example, with or without attachments).