For an entry-level application, follow the instructions for a basic single user install.
The client interface is a thin Access database that uses ODBC linked tables, Pass Through Queries and ADO to interact with the business entity. The Access database does not contain any business logic or queries; these are processed by Sql Server. It is therefore both a practical tool, but also a fully specified model for future developments, such as a mobile app or ASP.NET website. The client is documented in the tutorials.
The first section describes how to install the client locally, the second section sets up a connection to Azure Sql and includes the VSTO templates.
Pre-requisite: Office 365 Business 64 bit.
If your machine is 32 bit, clone the repository and re-compile the solution with an alternative build target.
First, if not already available, install and configure an instance of Trade Control in Azure Sql and add data users. Use Azure Portal to register your fixed IP Address with the database firewall. Install the Office Client on your machine.
office client - tcOfficeClient.zip
Office modifies documents. When upgrading, ensure you install the latest version by uninstalling the old client first.
The Trade Control client is installed into the user’s local AppData folder. There are two open modes: compiled and un-compiled. If you are using the Bitcoin Wallet, you must use the Native Version, since Bitcoin is not supported by the Windows OS as a Unit of Account and the client must re-configure itself locally.
The un-compiled database is called TCnode_3 with the file extension .accdb. When you first open it, the Trust Centre may disable the app. If you close any open forms and enable it manually, trust should be established. By default, the database opens in run mode, with a limited development interface. Press F11 to open the Navigation Pane where you can modify or add objects. Press the SHIFT key down to open the database in non-execution mode. Even if you are not a developer, this mode allows you to hard-code changes to column orders, styling and the like.
Note:
Modifying the native version may result in your changes being overwritten by an upgrade. An empty container is provided for this purpose in the compiled version.
By default, the installed location is untrusted. To remove the opening dialog, add the Trade Control folder to the trusted locations from the Access Trust Centre available in Options.
The compiled database is called TCnode3.accde. It is referenced by CTnode_3.accdr, which, other than the standard reports, is an empty run-time container where you can add your own custom developments. To do this, copy the container and change the extension to .accdb. Any objects that you create will be visible to the menu system through the project name TradeCustom.
From the Menus page of the Administration form, create a new menu or add your forms to those that already exist. Users can have more than one menu, so you just add the new menu to the users that require it using the + button on the Users page.
When you load the client for the first time you will be presented with the connection dialog below. The dialog is available from the menus so you can switch between companies and/or the tutorials.
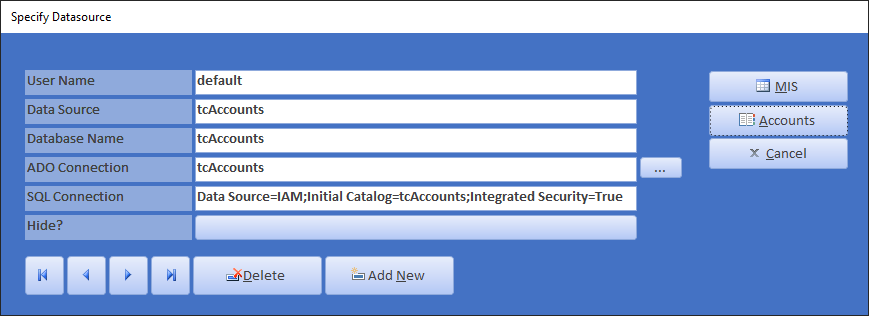
There are two pre-loaded connections; one for Azure Sql and another for Windows Authentication. You need to create an ODBC data source and replace the tags with your own settings.
The User Name just identifies the connection. It is useful if you are connecting to Azure and more than one-person logs onto the client from the same Windows account.
The second setting specifies an ODBC Data Source (32 bit), which is also the name of the Windows program where it is specified. Add a data source using ODBC Driver 17 for Sql Server or higher.
The Data Source is for Access to link tables and pass-through queries. The ADO connection string is used by VBA to call stored procedures; and the last connection is passed to a COM interop assembly in the GAC to output XML, consumed by the Word templates.
The following is a record of the pre-release installation test for Trade Control. You require an Office 365 Business subscription. Consult the installation documentation for more details.