The Trade Control schema can run on any Sql Server instance supporting Compatibility Level 2016 (130) or higher.
The best place to deploy is Azure Sql, starting with the basic price tier. Each database costs a few pounds per month; it is globally available, backed up and secure.
Alternatively, an enterprise instance on the corporate network if you have one. For a single, offline local deployment, use the free Sql Server Express.
Whilst Sql Servers using Windows Authentication are supported, the following assumes you are using Azure. For the former, consult the relevant documentation.
If you are not already registered with Microsoft Azure, sign up for the basic service. Follow the instructions for creating an Sql Database. Name the server after your business and use an admin name for the user account. Create a database named tcBusinessName. To avoid unnecessary costs, make sure you begin by setting the pricing tier to basic. You can uprate it later. Note the name of your server, which will be something like businessname.database.windows.net or copy the .Net connection string in the Azure portal.
current release - tcNodeConfig.zip
Download and install the C# app into a 64-bit Windows environment. Run setup.exe to install missing dependencies.
Note: some older versions of Windows are not compatible with .NET Framework 4.7.2. If affected, you must update the OS or recompile the solution with a lower versioned framework.
The .NET assembly version is the same as the Trade Control Node that it installs or upgrades. This is displayed on the first page.
Errors are shown on the appropriate page but are also written to an error log in more detail. File tcnodeconfig_errorlog.csv can be found in the Documents\Trade Control folder.
When you first load the app, it will request a connection. It must be to either an empty database or a valid instance. Otherwise the connection request will be rejected. Below is a valid example. If you are creating a new instance, make sure you log on with your Azure Sql Server admin account.
The button to the far right of the server name will collect local instances of Sql Server. For Azure, type in the server name manually.
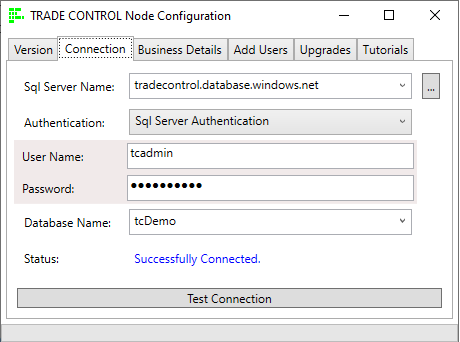
When you test the connection, a series of checks are applied to assess its current state. If this results in an action, the test is automatically re-applied. The checks are:
The details below are all you need to install an instance that can be used by clients. However, if you have never used Trade Control before, it will be difficult to know how to proceed. Either you can accept these defaults and try out the tutorials; or enter the correct information, add yourself as a data user and then install a basic setup.
Trade Control supports both fiat and bitcoin as your Unit of Account. If you select bitcoin, the configuration process will be slightly different. Consult the bitcoin wallet documentation for details.
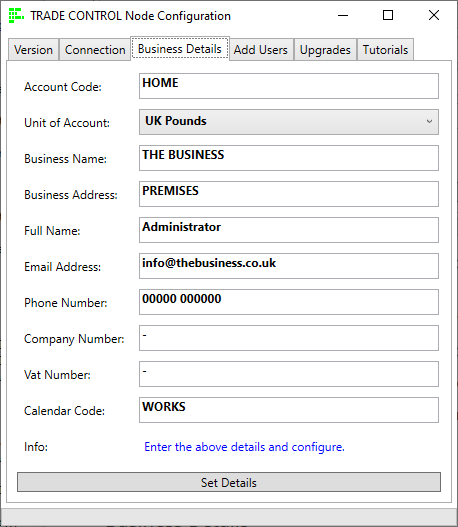
Refer to procedure App.proc_NodeInitialisation() for the T-SQL that first configures the instance. Its parameters match the data specified on this page, but it also adds the administrator account and populates the enumerated type tables
Once you have entered your business details, you will be able to connect from a client using your admin credentials. However, it is recommended that you create at least one user account for yourself that does not have administrative permissions to the database.
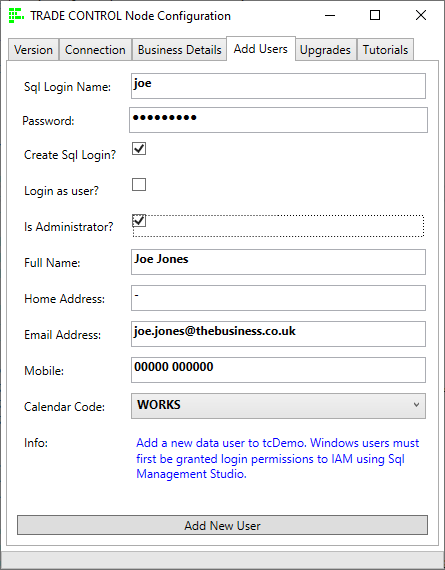
If the user is already registered with the server, you can leave the password blank and the Create Sql Login and Login as User flags will be disabled. When the Login as User flag is checked, the user will be created, and the connection changed to the new user. This is what you should do when you first create a Basic Set-up or run the Tutorials. Otherwise the objects will be assigned to the administrator account.
Checking the IsAdministrator flag gives rights to the Usr schema. It is necessary if you intend to run the tutorial scripts under this account. It does not, however, give the user administrative rights to the database.
New users are added by calling the procedure Usr.proc_AddUser(). It carries out the following operations:
To get started, the system needs to know your financial year, the government of the presiding jurisdiction, your bank and at least one bank account. Here there are three, modelled by Cash Accounts:
Bitcoin users do not use a bank or transact exchanges from bank accounts. Instead, their current and reserve accounts correspond to HD Wallets. Therefore, the basic setup has different defaults to that shown below.
Login as a data user. Select the configuration template that best matches your requirements. For the tutorials, choose the correct template and enter a reserve account. If you do not have a reserve account, leave it blank. You can edit/delete all these settings later from a client.
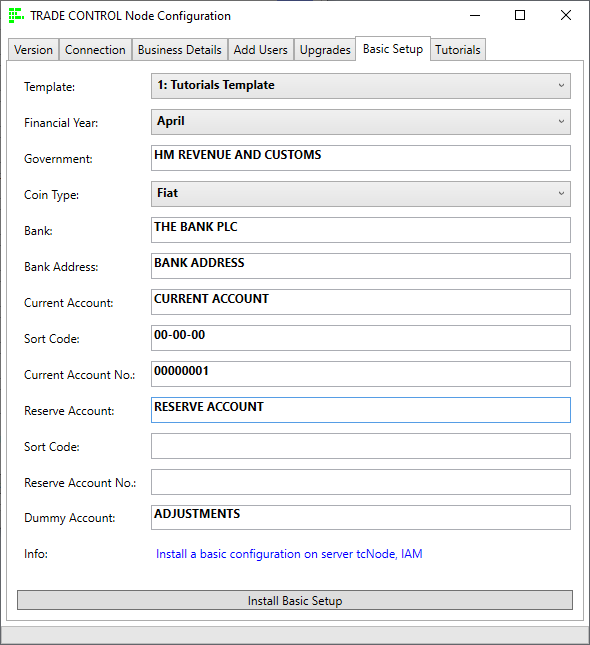
Each template registers your government and bank accounts, then adds the following:
You are now able to install the services or manufacturing tutorials.
Note
The connected data user must be an Administrator to execute the procedure because it wipes the selected database.
Install the tutorial using the Trade Control Configurator. Follow the instructions until you get to the screen below. If you want, you can replace the fiat payment system with a bitcoin wallet.
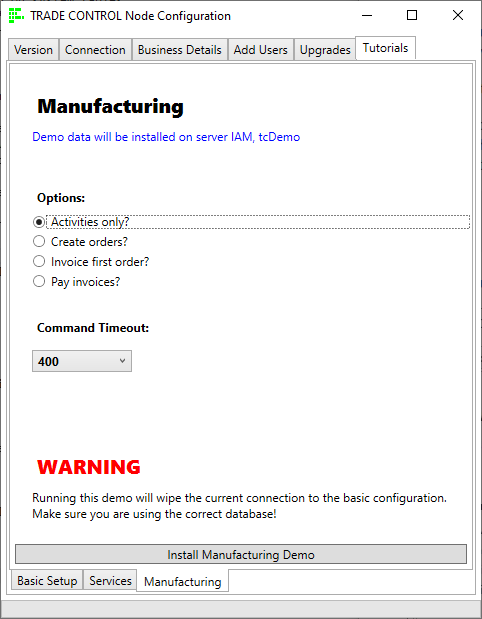
There are four modes of installation, allowing you to review how the Bill of Materials (BoM) is constructed and deployed. First install with the Activities selected, which will create the BoM. Re-running the installation, setting each option on in turn, re-creates the BoM and activates the instruction. In so doing, you can obtain a vital understanding of accruals from the Company Statement.
Install the tutorial using the Trade Control Configurator. Follow the instructions until you get to the screen below.
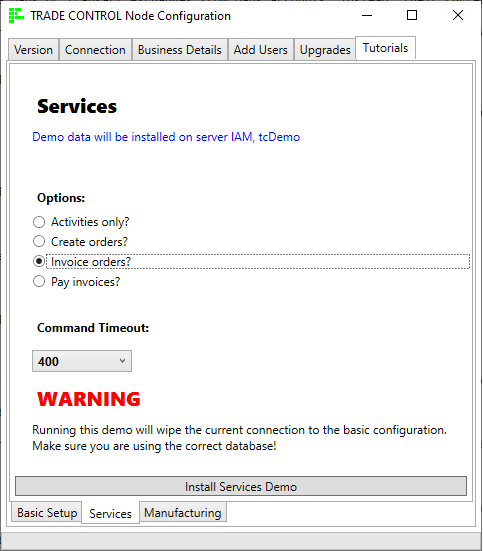
Select the Pay Invoices option first, then try out the other options at the end of the tutorial.